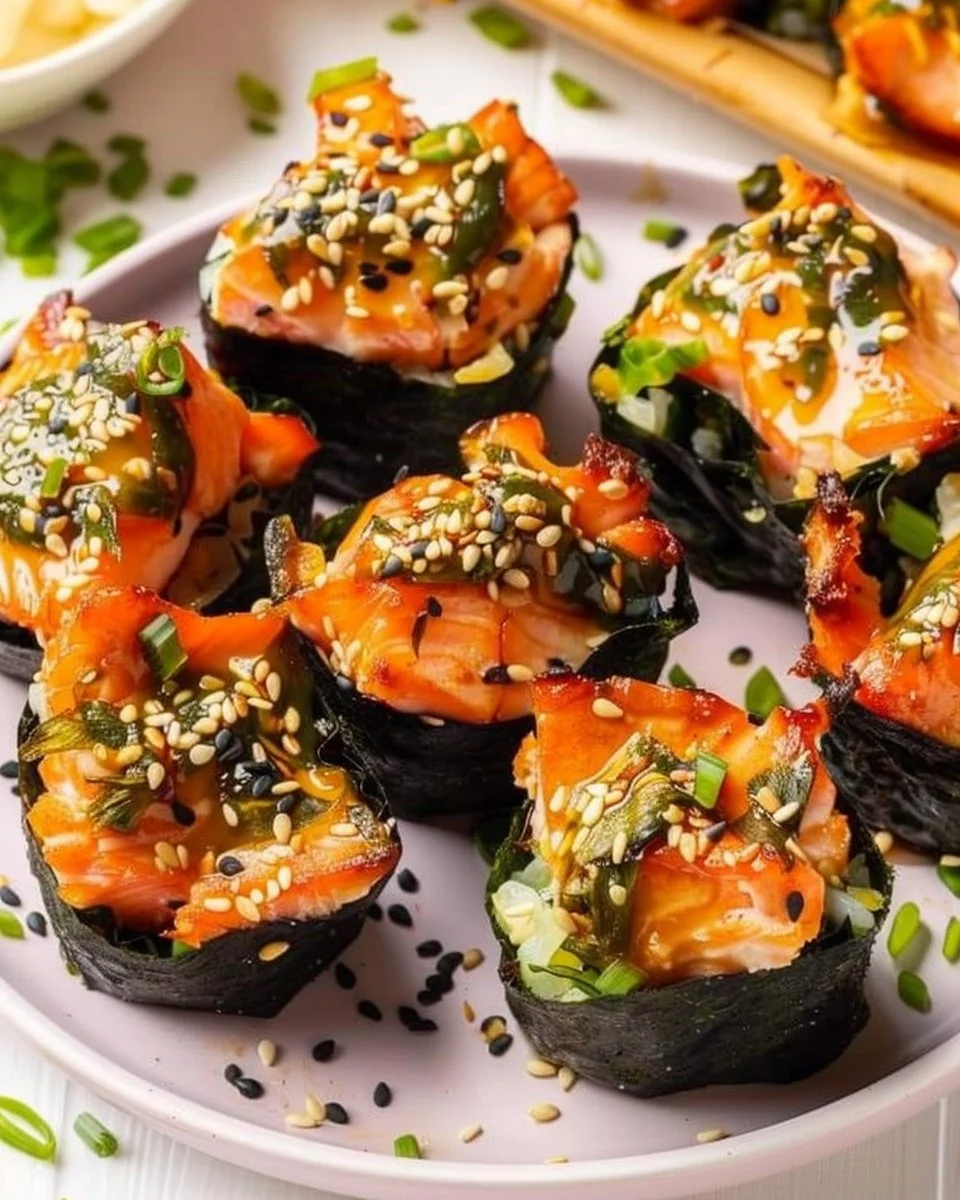
Easy Baked Salmon Sushi Cups are a fun, approachable twist on sushi that brings bold flavors and easy prep to weeknight dinners or party appetizers. If you enjoy playful, bite-sized meals, you might also like an easy baked chicken breast recipe that pairs well with simple sides. This article walks you through why this recipe works, how to make it step-by-step, tips, variations, storage guidance, nutrition estimates, and answers to common questions.
Why make Easy Baked Salmon Sushi Cups
These salmon sushi cups combine the best parts of sushi—short-grain rice, savory seafood, and a touch of heat—into a convenient, oven-baked format. They’re perfect when you want the sushi experience without raw fish preparation, specialized rolling skills, or long restaurant waits.
They work for many occasions. Make them as a family dinner that feels special but doesn’t require hours in the kitchen. Assemble a batch for potlucks or casual gatherings where guests can pick up a single-serving bite. They’re also excellent for meal prep: the baked salmon keeps well and the components reheat cleanly.
The format is forgiving. Because the salmon is cubed, coated in flavorful sauce, and baked, even smaller pieces cook evenly. Nori sheets act like mini cups, holding rice and salmon together, which reduces mess and makes them easy to eat with fingers or chopsticks.
Finally, these cups let you control the spice, fat, and salt levels. Use less Sriracha for a milder bite, swap Kewpie mayo for a lighter option, or add veggies on top for fiber and color.
How to make Easy Baked Salmon Sushi Cups
Below is a friendly, step-by-step guide to assembling and baking these sushi cups. Read through the full directions once before you start so your kitchen time flows smoothly.

Ingredients :
- 1 lb salmon, cubed
- 1 tbsp light soy sauce
- 1 tbsp Kewpie Mayo
- 1 tbsp Sriracha
- 1 tsp sesame oil
- 1 ½ cup uncooked sushi rice
- 1 tbsp rice vinegar
- 2 tsp white sugar
- 3 large nori sheets
- Furikake, for garnish
- 1 green onion, for garnish
- Cooking spray
Ingredient notes and substitutions:
- Salmon: Use fresh, sashimi-grade if you want the highest quality, but any fresh salmon fillet works since it will be fully cooked. For a budget-friendly swap, try canned salmon (well drained) or flaked cooked salmon—adjust moisture and sauce accordingly.
- Kewpie mayo: If you don’t have Kewpie, use regular mayonnaise mixed with ¼ tsp rice vinegar and a pinch of sugar to mimic Kewpie’s sweet tang.
- Light soy sauce: Controls salt—use low-sodium soy sauce if you watch sodium. Tamari is a good gluten-free alternative.
- Sushi rice: Short-grain rice gives the best sticky texture. If you use a different rice, expect changes in texture and how well the nori holds.
- Nori sheets: Make sure sheets are fresh (not humid) so they crisp when baked. If nori isn’t available, use thin wonton wrappers lightly brushed with oil for a different but tasty cup.
- Furikake: A Japanese seasoning with sesame seeds and seaweed—adds crunch and umami. Toasted sesame seeds plus a pinch of salt and dried seaweed flakes can be a substitute.
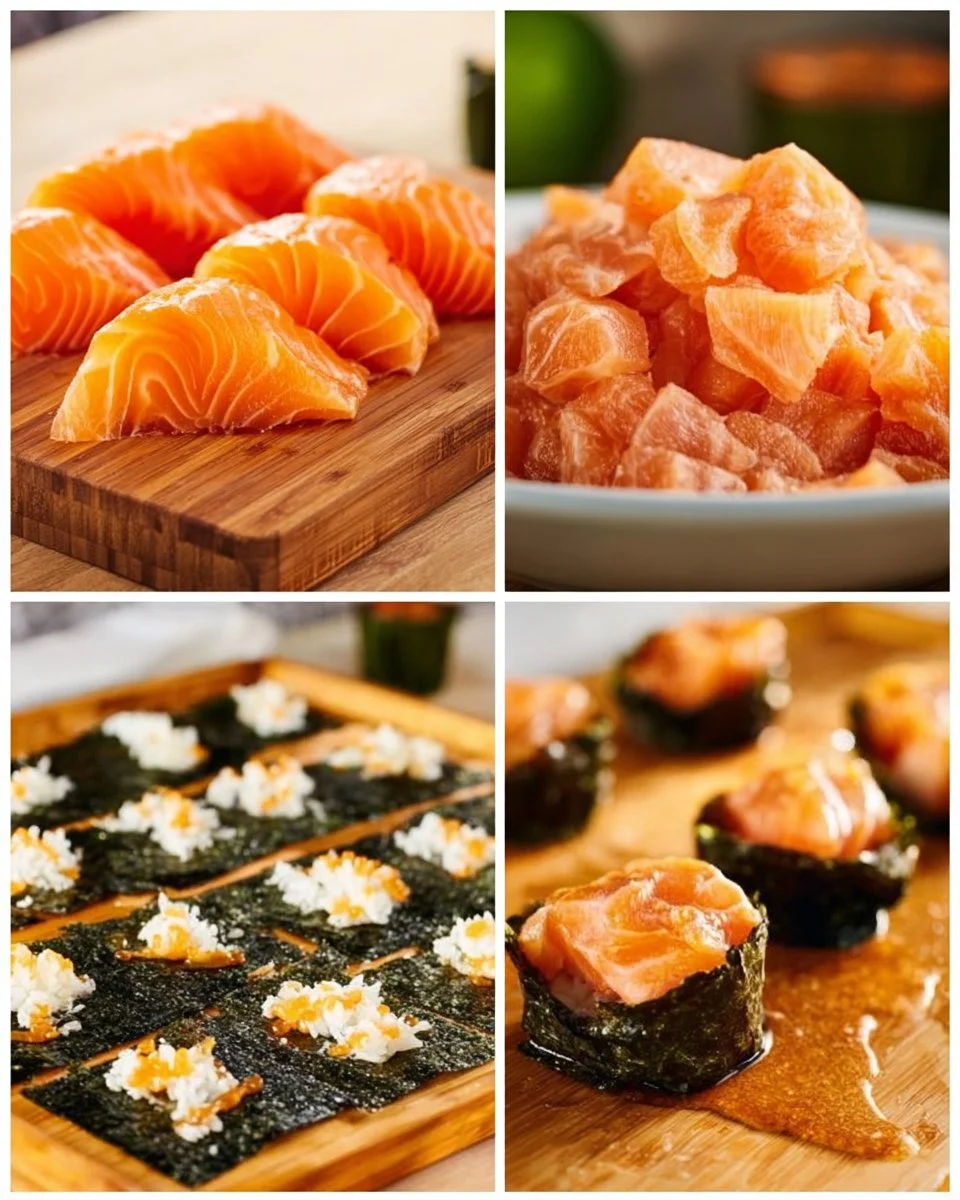
Directions :
- Prepare the Sushi Rice: Cook the sushi rice according to package instructions and set aside to cool slightly.
- Make the Vinegar Mixture: In a microwave-safe bowl, combine rice vinegar and white sugar, microwave until sugar dissolves. Pour over cooked rice and mix.
- Preheat the Oven: Preheat to 400°F (200°C).
- Prepare the Salmon Mixture: Mix cubed salmon with soy sauce, Kewpie mayo, Sriracha, and sesame oil in a bowl.
- Prepare the Nori Sheets: Cut nori sheets into rectangles or squares.
- Assemble the Sushi Cups: Grease muffin tin, place sushi rice in nori squares in the tin, add salmon mixture on top.
- Bake: Bake for 15 minutes until salmon is fully cooked and tops are golden brown.
- Garnish and Serve: Cool slightly, drizzle with Sriracha or spicy mayo, garnish with furikake and green onions, and serve.
Pro Tips for Success Easy Baked Salmon Sushi Cups
- Chill the rice just enough: Sushi rice should be warm or room temperature when you shape it into cups. If it’s too hot, it will steam the nori and turn soggy; if it’s cold, it won’t stick as well. Aim for just-warm rice.
- Dry your nori: If nori sheets feel damp or soft, crisp them in a 1-2 minute bake at 275°F before cutting. Dry, crisp nori holds a cup shape better while baking.
- Don’t overfill the cups: A compacted rice base plus a modest amount of salmon will cook more evenly and prevent falling apart when you remove them from the tin.
- Use a light coating of cooking spray in the muffin tin: That helps the nori cups release cleanly. If you like extra crispness, brush the top of the salmon lightly with sesame oil before popping them in the oven.
- Keep an eye on baking time: Salmon pieces are small and cook quickly. Start checking at 12 minutes; you want them cooked but still moist. The tops should be slightly golden.
- Prep toppings ahead: Mix spicy mayo (Kewpie + Sriracha) and thinly slice green onions before baking so you can finish the cups while they’re still warm.
Flavor Variations Easy Baked Salmon Sushi Cups
- Spicy Crunch: Add a tablespoon of finely chopped tempura bits or crushed panko mixed with a touch of sesame oil on top of the salmon before baking. It gives a delightful crunch and amplifies texture contrast.
- Citrus Ponzu Twist: Replace the light soy sauce with 1 tbsp ponzu and a squeeze of fresh lemon or yuzu if available. The bright citrus cuts the richness and adds an elegant, refreshing tone.
- Miso-Glazed Salmon: Stir 1 tsp white miso into the mayo mixture to add savory depth and amber color when baked. Miso adds umami and a pleasant caramelized finish.
- Veggie-Loaded Cups: Fold finely diced cucumber, avocado, or pickled daikon into the rice base for a fresher, balanced cup. If using avocado, add right before serving to avoid browning.
- Teriyaki Style: Replace soy sauce and sesame oil with an equal mix of reduced teriyaki glaze and a splash of rice vinegar; finish with toasted sesame seeds.
Serving Suggestions Easy Baked Salmon Sushi Cups
These cups are versatile. Serve them as an appetizer at a party with chopsticks or finger forks, or present them as the main dish with a few simple sides:
- Pickled ginger and a small bowl of low-sodium soy sauce or ponzu for dipping.
- Simple seaweed salad or cucumber sunomono to add a bright, acidic contrast.
- A side of steamed edamame sprinkled with flaky sea salt for protein and balance.
- Miso soup in small bowls to round out the meal.
- A chilled rice vinegar cucumber salad or shredded carrot slaw for crunch and color.
For a family-style dinner, plate a row of cups on a platter with a small dish of spicy mayo on the side and extra furikake for sprinkling.
Storage and Freezing Instructions Easy Baked Salmon Sushi Cups
- Short-term storage: Store cooled cups in an airtight container in the refrigerator for up to 2 days. Reheat in a 350°F oven for 6–8 minutes to restore crispness, or microwave briefly (30–45 seconds) if you’re in a hurry—microwaving will soften the nori.
- Freezing: These hold up better refrigerated than frozen. If you must freeze, place cooled cups on a tray to flash-freeze for 1–2 hours, then transfer to a freezer-safe container or bag. Freeze up to 1 month. To reheat, bake from frozen at 375°F for 12–18 minutes, covering loosely with foil if the tops brown too quickly.
- Make-ahead tips: Prepare the rice and salmon mixture a few hours ahead, keep them separate in the refrigerator, then assemble and bake right before serving. This maintains the freshest texture for the nori and rice.
Nutrition Facts (Per Serving) — approximate
Note: Nutrition values are estimates based on typical ingredient amounts and a recipe yield of six servings. Individual brands and portion sizes will alter these numbers.
- Calories: ~365 kcal
- Protein: ~22 g
- Carbohydrates: ~39 g
- Fat: ~13 g
- Fiber: ~1 g
- Sodium: ~600 mg
If you need more precise values, weigh your ingredients and use a nutrition calculator with your specific product labels. For lower sodium, choose a low-sodium soy sauce and reduce added salty toppings.
FAQ About Easy Baked Salmon Sushi Cups
Can I use raw salmon for this recipe?
No—this particular recipe bakes the salmon so it’s fully cooked, which makes it safe and accessible for family meals, parties, and leftovers. If you prefer raw salmon sashimi-style, use sashimi-grade salmon and avoid the baking step; instead, serve the seasoned raw salmon over chilled sushi rice immediately. Always source high-quality sashimi-grade fish and handle it with strict cold-chain care if opting for raw fish.
How many sushi cups does this recipe make?
Yield depends on how you cut your nori and how much rice you press into each cup. With 3 large nori sheets and 1 ½ cups uncooked sushi rice, expect roughly 8–12 medium-sized cups, which is about 6 servings for an entrée or 8–12 for appetizers. If you need a precise count for an event, do a test assembly of a couple of cups first to determine exact portion sizes.
Can I prepare this recipe without a muffin tin?
Yes. If you don’t have a muffin tin, use a shallow oven-safe ramekin, a mini tart pan, or even a small ovenproof silicone mold to shape the nori and rice. You can also bake the salmon-topped rice on a lined baking sheet and serve it as small squares with nori strips on the side, but the cup shape is easiest for handheld eating.
How do I prevent the nori from getting soggy?
To prevent soggy nori, avoid packing excessively hot rice into the sheet. Let the rice cool slightly so it’s warm, not steaming. A light spray of oil in the muffin tin and a quick pre-bake of the nori at low heat (275°F for 1–2 minutes) can help crisp the sheet before assembly. Also, serve shortly after baking—nori softens over time when exposed to moisture.
Is this recipe kid-friendly and customizable for picky eaters?
Absolutely. The flavor profile can be dialed back for kids by reducing or omitting Sriracha. Swap in plain mayo for a milder taste, and consider mixing some cooked, finely shredded vegetables into the rice (like carrots or peas) to boost nutrition. Present the sauce separately so kids can add only what they like.
Can I substitute other fish or proteins?
Yes. This method works well with cooked shrimp, flaked cooked white fish, crab (real or imitation), or even marinated tofu for a vegetarian option. Adjust the cook time for each protein—shrimp cooks quickly and benefits from short baking, while tofu should be pressed and lightly pan-fried beforehand for the best texture.
Final Thoughts
Easy Baked Salmon Sushi Cups are a flexible, flavor-forward dish that brings sushi-style ingredients into a convenient, oven-baked package. They’re perfect when you want something special without complicated rolling techniques or raw fish handling. With a little prep and a few pantry staples, you can make a crowd-pleasing appetizer or a satisfying main that’s easy to customize and reheat. Try the variations to suit your taste, and keep the pro tips in mind for the best texture and presentation. Enjoy the bright, savory bites—and feel free to experiment with toppings and sauces to make the recipe your own.
Print
Easy Baked Salmon Sushi Cups
- Total Time: 30 minutes
- Yield: 6 servings
- Diet: Pescatarian
Description
A fun twist on sushi featuring baked salmon, short-grain rice, and bold flavors in a convenient cup format. Perfect for weeknight dinners or party appetizers.
Ingredients
- 1 lb salmon, cubed
- 1 tbsp light soy sauce
- 1 tbsp Kewpie mayo
- 1 tbsp Sriracha
- 1 tsp sesame oil
- 1 ½ cup uncooked sushi rice
- 1 tbsp rice vinegar
- 2 tsp white sugar
- 3 large nori sheets
- Furikake, for garnish
- 1 green onion, for garnish
- Cooking spray
Instructions
- Prepare the sushi rice: Cook the sushi rice according to package instructions and set aside to cool slightly.
- Make the vinegar mixture: In a microwave-safe bowl, combine rice vinegar and white sugar, microwave until sugar dissolves. Pour over cooked rice and mix.
- Preheat the oven: Preheat to 400°F (200°C).
- Prepare the salmon mixture: Mix cubed salmon with soy sauce, Kewpie mayo, Sriracha, and sesame oil in a bowl.
- Prepare the nori sheets: Cut nori sheets into rectangles or squares.
- Assemble the sushi cups: Grease a muffin tin, place sushi rice in nori squares in the tin, add salmon mixture on top.
- Bake: Bake for 15 minutes until salmon is fully cooked and tops are golden brown.
- Garnish and serve: Cool slightly, drizzle with Sriracha or spicy mayo, garnish with furikake and green onions, and serve.
Notes
Adjust seasoning and toppings based on personal taste preferences. Consider adding veggies for added nutrition.
- Prep Time: 15 minutes
- Cook Time: 15 minutes
- Category: Appetizer
- Method: Baking
- Cuisine: Japanese